Content Management anywhere in Shopware 6
The Content Management System in Shopware 6 is called Shopping Experiences. But in this post I will always talk from Content Management when I mean the Shopping Experiences, just to clarify. I will explain how you can use the Content Management to build custom product pages with Shopware 6. The idea is to connect your product (or other entities) with any CMS page and render the content from you CMS page into the DOM. At many page types and places you can add content via the administration (layouts) but when you want for example different content in different tabs you can not solve this via administration and need some custom code/template. So this tutorial is for that case.
What we need to do?Link to this section
- Create a new plugin (ExampleProductCms)
- Use a custom field to connect the product with the cms page
- A subscriber to load and set the cms page content to the product data
- We need to render the html content in a twig template to display
- Conclusion
Create a new pluginLink to this section
This point I will not explain that much, because there is a plugin base guide you should read and there is also console command to create the plugin base structure (bin/console plugin:create). For this post lets assume our plugin is called ExampleProductCms and we placed it in this path: custom/static-plugins/ExampleProductCms. Create the base structure and activate your plugin. You should see it when you execute bin/console plugin:refresh.
Use a custom field to connect the product with the cms pageLink to this section
Some will maybe ask why we use a custom field at this point? And the answer is simple, because we only wanna display some content on the product detail page. If you wanna filter or search, then a custom field would not fit the best. You could also use an entity extensions but then you have to take care about the admin UI and CRUD operations. So custom field is the easy solution here and you can also hide it from the admin that a normal admin user can not delete your custom field.
So I would suggest you to create a simple Class called ProductCustomFields in custom/static-plugins/ExampleProductCms/src/Definition/ with the array of the custom field you wanna create.
<?php declare(strict_types=1);

namespace Example\ProductCms\Definition;

use Shopware\Core\System\CustomField\CustomFieldTypes;

class ProductCustomFields
{
    public const FIELDSET_NAME = 'product_cms_fields';

    public const FIELD_CMS_STORY_ID = 'product_cms_story_id';

    public static function get(): array
    {
        return [
            'name' => self::FIELDSET_NAME,
            'config' => [
                'label' => [
                    'de-DE' => 'Produkt CMS',
                    'en-GB' => 'Product CMS',
                ],
            ],
            'position' => 0,
            'customFields' => [
                [
                    'name' => self::FIELD_CMS_STORY_ID,
                    'type' => CustomFieldTypes::HTML,
                    'config' => [
                        'label' => [
                            'de-DE' => 'Story CMS Page',
                            'en-GB' => 'Story CMS Page',
                        ],
                        'helpText' => [
                            'de-DE' => 'Wähle die CMS Seite aus welche du als Story verwenden willst.',
                            'en-GB' => 'Choose the CMS Page you wanna use as story.',
                        ],
                        'componentName' => 'sw-text-editor',
                        'customFieldType' => 'textEditor',
                        'customFieldPosition' => 12,
                    ],
                ],
            ],
            'relations' => [
                ['entityName' => 'product'],
            ],
        ];
    }
}
When you have this ProductCustomFields class you can use it in your Shopware Plugin class. There are lifecycles where you can add, update, delete the custom field. I use a $this->container->get('custom_field_set.repository'); to upsert the custom fields on install and update. And when the plugin will be uninstalled we delete the custom field. This part you have to do by yourself, it a good learning. If you do not wanna do this, just create the custom field via administration.
A subscriber to load and set the cms page content to the product dataLink to this section
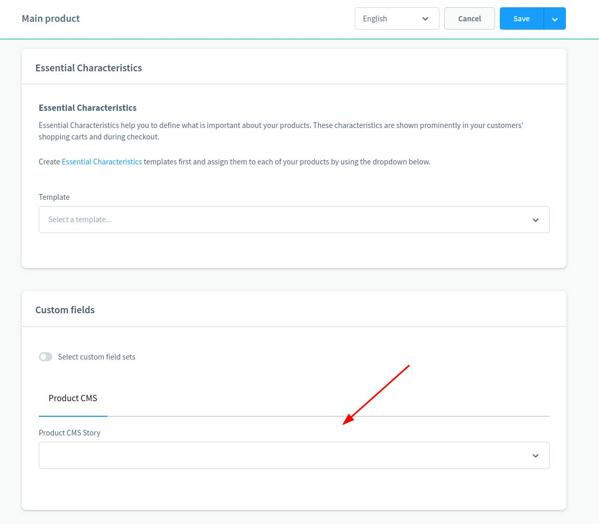
After you executed bin/console plugin:update ExampleProductCms you should see in admin page on product level a new custom field where you can select any CMS page. When you now select as CMS Page and save the product the UUID of that CMS page can be found in the product data when you dump the product via twig. But we want to have the CMS Content that means the HTML that our Content Manager created. So we will use a subscriber on a Shopware Event to load the CMS Page and add the HTML data. To add a subscriber we need to create the ProductPageSubscriber class and add this class then to the services.xml.
File path: custom/static-plugins/ExampleProductCms/src/Subscriber/ProductPageSubscriber.php
<?php declare(strict_types=1);

namespace Example\ProductCms\Subscriber;

use Example\ProductCms\Definition\ProductCustomFields;
use Shopware\Core\Content\Cms\SalesChannel\SalesChannelCmsPageLoader;
use Shopware\Core\Framework\DataAbstractionLayer\Search\Criteria;
use Shopware\Core\Framework\Struct\ArrayEntity;
use Shopware\Storefront\Page\Product\ProductPageLoadedEvent;
use Symfony\Component\EventDispatcher\EventSubscriberInterface;

class ProductPageSubscriber implements EventSubscriberInterface
{
    private SalesChannelCmsPageLoader $cmsPageLoader;

    public function __construct(
        SalesChannelCmsPageLoader $cmsPageLoader
    ) {
        $this->cmsPageLoader = $cmsPageLoader;
    }

    public static function getSubscribedEvents()
    {
        return [
            ProductPageLoadedEvent::class => 'onProductPageLoaded',
        ];
    }

    public function onProductPageLoaded(ProductPageLoadedEvent $event): void
    {
        $page = $event->getPage();
        $customFields = $page->getProduct()->getCustomFields();

        if (!$customFields) {
            return;
        }

        $cmsPages = [];
        $mapHelper = [];

        if (isset($customFields[ProductCustomFields::FIELD_CMS_STORY_ID])) {
            $mapHelper['story'] = $customFields[ProductCustomFields::FIELD_CMS_STORY_ID];
        }

        if (!empty($mapHelper)) {
            $cmsPageResult = $this->cmsPageLoader->load(
                $event->getRequest(),
                new Criteria(array_values($mapHelper)),
                $event->getSalesChannelContext()
            );
            foreach ($cmsPageResult as $cmsPageId => $cmsPage) {
                foreach ($mapHelper as $mapKey => $mapValue) {
                    if ($cmsPageId === $mapValue) {
                        $cmsPages[$mapKey] = $cmsPage;
                    }
                }
            }
        }

        $page->addExtension('product_cms', new ArrayEntity([
            'cms_pages' => $cmsPages,
        ]));
    }
}
File path: custom/static-plugins/ExampleProductCms/src/Resources/config/services.xml
<?xml version="1.0" ?>

<container xmlns="http://symfony.com/schema/dic/services"
           xmlns:xsi="http://www.w3.org/2001/XMLSchema-instance"
           xsi:schemaLocation="http://symfony.com/schema/dic/services http://symfony.com/schema/dic/services/services-1.0.xsd">
    <services>
        <service id="Example\ProductCms\Subscriber\ProductPageSubscriber">
            <argument type="service" id="Shopware\Core\Content\Cms\SalesChannel\SalesChannelCmsPageLoader"/>
            <tag name="kernel.event_subscriber"/>
        </service>
    </services>
</container>
You seen that we wait for the ProductPageLoadedEvent to get called and then we execute our custom code. We get the custom fields from the product check if our defined custom field is set, if yes we use the SalesChannelCmsPageLoader to load the CMS Content/HTML. There is also a simple mapper to have a shorter name in twig templates and to be prepared if you want to load more different pages with one load call. At the end we add the CMS Pages as an array into the extensions of the page. Now we just need to render it at some proper place.
We need to render the html content in a twig template to displayLink to this section
Let’s say we want to display this content instead of the Shopware 6 default tabs. In this example we will overwrite the block {% block page_product_detail_tabs %} in the Storefront/storefront/page/product-detail/index.html.twig template. So we will create a template file in our plugin that should look like the following.
{% sw_extends "@Storefront/storefront/page/product-detail/index.html.twig" %}

{% block page_product_detail_tabs %}
	{% block page_product_detail_story %}
		{% if page.extensions.product_cms.cms_pages.story %}
		<div class="product-detail-story">
			{% sw_include "@Storefront/storefront/page/content/detail.html.twig" with {
				'cmsPage': page.extensions.product_cms.cms_pages.story
			} %}
		</div>
		{% endif %}
	{% endblock %}
{% endblock %}
So if our ProductPageSubscriber is setting the data correct into page.extensions.product_cms.cms_pages.story we will include the core template Storefront/storefront/page/content/detail.html.twig and set our cmsPage we selected before in the administation. Everything else happens inside the core templates with the different sections and the section templates then using the block templates, so this is pretty the same that is happening on normal cms pages or landing pages.
ConclusionLink to this section
You can use the Shopware 6 Layout/Pages from Content Management also in smaller parts on your E-Commerce Website. You need to define the places where you wanna display them and you need to add the custom fields to the entities you wanna use them. The most useful places will be on category and product pages to tell your product stories there. ⚠️ But do not forget that you already have a powerful CMS where you can edit and place content at many places without to develop a custom solution. ⚠️